
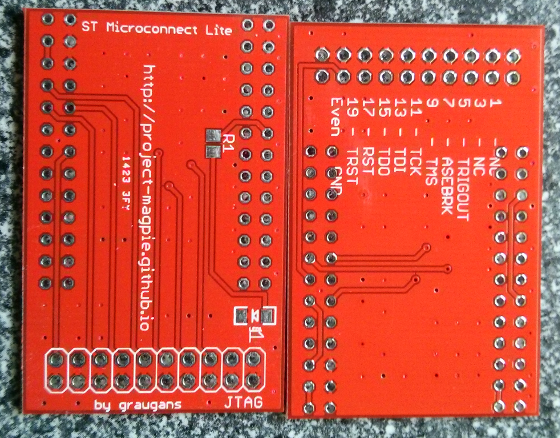
Sti7111 (ST40) JTAG preparations
While I almost smashed my Spark 7111 Box during UBI experiments I decided to build a JTAG adapter for the ST40 CPU. After getting a little more familiar with eagle my second design ended in the ST40 JTAG adapter.
I ordered the PCB at Seeedstudio Fusion PCB and was impressed how cheap and fast they are.
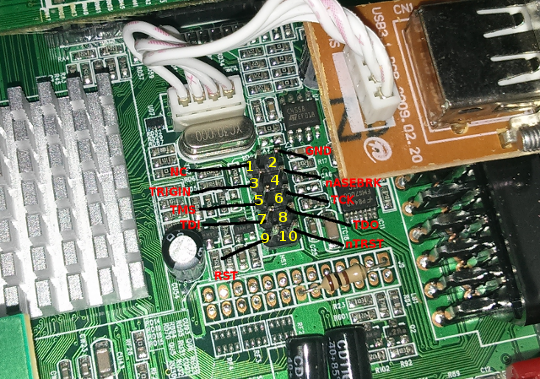
After assembly of the PCB the JTAG adapter have to be connected to the STB. If you are unsure about the pinning you can easily check if Pin-2 is connected to GND with a multimeter.
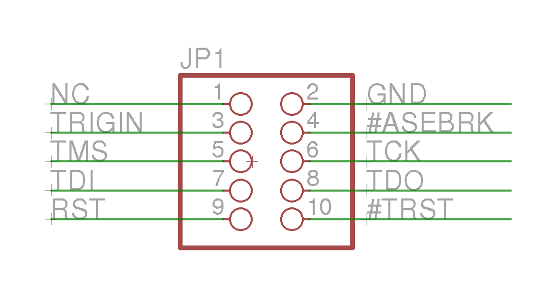
A more detailed version reconstructed in eagle.
Anyway, most hardware is useless without software. To use the JTAG Adapter the ST40 Micro Toolset is needed. You can grab your version of the ST40 Micro Toolset at the STM ftp server. As usual I decided to take the linux version (R5.1.0). I have tested with Ubuntu 12.04. Maybe the 32bit compatibility libs have to be installed if you are running a 64bit distro. You also need the ST Micro Connection Package R1.6.0.. After Installation the folder structure should look like this:
$ tree -L 1 /opt/STM/
/opt/STM/
├── ST40R5.1.0
└── STMCR1.6.0
To be able to execute the binaries some modifications to the PATH and LD_LIBRARY_PATH variable have to be made.
export LD_LIBRARY_PATH=/opt/STM/STMCR1.6.0/lib:/opt/STM/ST40R5.1.0/lib
export PATH=/opt/STM/ST40R5.1.0/bin:/opt/STM/STMCR1.6.0/bin:$PATH
Now you sould be able to execute the following command
$ sh4xrun
usage: /opt/STM/ST40R5.1.0/bin/sh4xrun [-c command] [-d directory] [-e filename] [-f] [-g gdbpath] [-h] [-i filename] [-t     target] [-u gdbname] [-v] [-x filename] [-A command] [-B command] [-C option] [-D] [-T timeout] [-V] [-a|--] [arguments]
  -a arguments  target program arguments
  -c command    connection command (default is sh4tp)
  -d directory  directory in which to search for command files
  -e filename   executable file to load
  -f            (ignored)
  -g gdbpath    specify path to GDB
  -h            display help
  -i filename   command script file to source
  -t target     target specification
  -u gdbname    specify name of GDB
  -v            verbose
  -x filename   use filename instead of .shgdbinit
  -A command    execute command after running program
  -B command    execute command before running program
  -C option     connection command option
  -D            debug (very verbose)
  -T timeout    maximum time for executing on target
  -V            version string
With this command a executable can be uploaded and executed right on the box. But what kind of executable is worthwhile to be uploaded? On Avi+ Forum they use a tool called flasher which is upload to the box. I prefer to use a self compiled version of u-boot. And honestly I did not managed to compile a flasher for the sti7111.
Compilation of U-Boot
Before we can compile the u-boot boot loader we have to get the source
$ git clone git://git.stlinux.com/stm/u-boot.git
$ cd u-boot/
$ git checkout -b stmicro-1.3.1 origin/stmicro-1.3.1
I decided to use stmicro-1.3.1 branch It sounds familiar and I was unable to build the stmicro branch. To compile the source I used a toolchain I’ve created with to meta-stlinux layer and yocto.
$ source /opt/poky/1.5.1/environment-setup-sh4-poky-linux
$ export CROSS_COMPILE=sh4-poky-linux-
$ unset LDFLAGS
$ make hdk7111_config
$ vim ./cpu/sh/config.mk
# remove option  -m4-nofpu
After a successful compilation you have a file called u-boot. This can be uploaded by executing:
sh4xrun -c sh4tp -t STMCLT1000_A:sat7111:st40,debug=2 -e /data/src/u-boot/u-boot
On a working serial console connected to the STB you should see something like this:
Board: STx7111-HDK  [29-bit mode]


U-Boot 1.3.1-dirty (Jun 15 2014 - 18:23:57) - stm23-2011-12-08

DRAM:  256 MiB
NOR:     8 MiB
NAND:  Bad block table found at page 262080, version 0x01
Bad block table found at page 262016, version 0x01
nand_read_bbt: Bad block at 0x04400000
nand_read_bbt: Bad block at 0x06580000
nand_read_bbt: Bad block at 0x065a0000
nand_read_bbt: Bad block at 0x0e580000
nand_read_bbt: Bad block at 0x0e5a0000
nand_read_bbt: Bad block at 0x10c00000
nand_read_bbt: Bad block at 0x10c20000
nand_read_bbt: Bad block at 0x16580000
nand_read_bbt: Bad block at 0x165a0000
nand_read_bbt: Bad block at 0x18c00000
nand_read_bbt: Bad block at 0x18c20000
nand_read_bbt: Bad block at 0x1dc40000
nand_read_bbt: Bad block at 0x1dc60000
nand_read_bbt: Bad block at 0x1e580000
nand_read_bbt: Bad block at 0x1e5a0000
512 MiB
SPI:  ERROR: Unknown SPI Device detected, status = 0xff
*** Warning - bad CRC, using default environment

In:    serial
Out:   serial
Err:   serial
It looks like the SPI NOR Flash is not supported by this version of u-boot. So work is to do….
blog comments powered by Disqus